 Deskmap
User guide
Deskmap puts each of your windows on the right display, on the right desktop, in the right size — and keeps putting it back, without you asking again.
You tell it once: "the window with acme-web in its title belongs on the monitor, desktop 2, left half." From then on it happens by itself: when you open the app, when you plug the monitor in, when you come back from lunch.
This guide takes about ten minutes. You need macOS 13 or later.
On this page
- 1. Install and give permission
- 2. Fix four macOS settings (once)
- 3. Pin your first window
- 4. Move it where it belongs
- Pin groups
- 5. Give it a size
- 6. Two plans: with monitor, without
- 7. Profiles: desk, café, presentation
- 8. When you change your mind
- 9. Desktop names and your monitor
- 10. One-key setups (optional)
- 11. If something doesn't happen
- The two sentences to remember
1. Install and give permission#
Copy Deskmap.app to your Applications folder and open it. It has no Dock icon; it lives in the menu bar.
The welcome guide opens on first launch and walks through three steps. Step 1 is the permission: click Open System Settings and allow.
macOS opens System Settings › Privacy & Security › Accessibility. Turn Deskmap on; the guide notices it by itself.
The app needs this to see window titles and to move windows. It reads nothing else: no network, no files of yours, no window contents.
Step 2 checks the macOS settings below, step 3 asks how to start: Pin my windows where they are (recommended) or Start empty. You can open the guide again from Settings › General.
Open Settings (⚙ in the toolbar, or ⌘,) › General and turn on Launch at login so Deskmap is there after every restart.
2. Fix four macOS settings (once)#
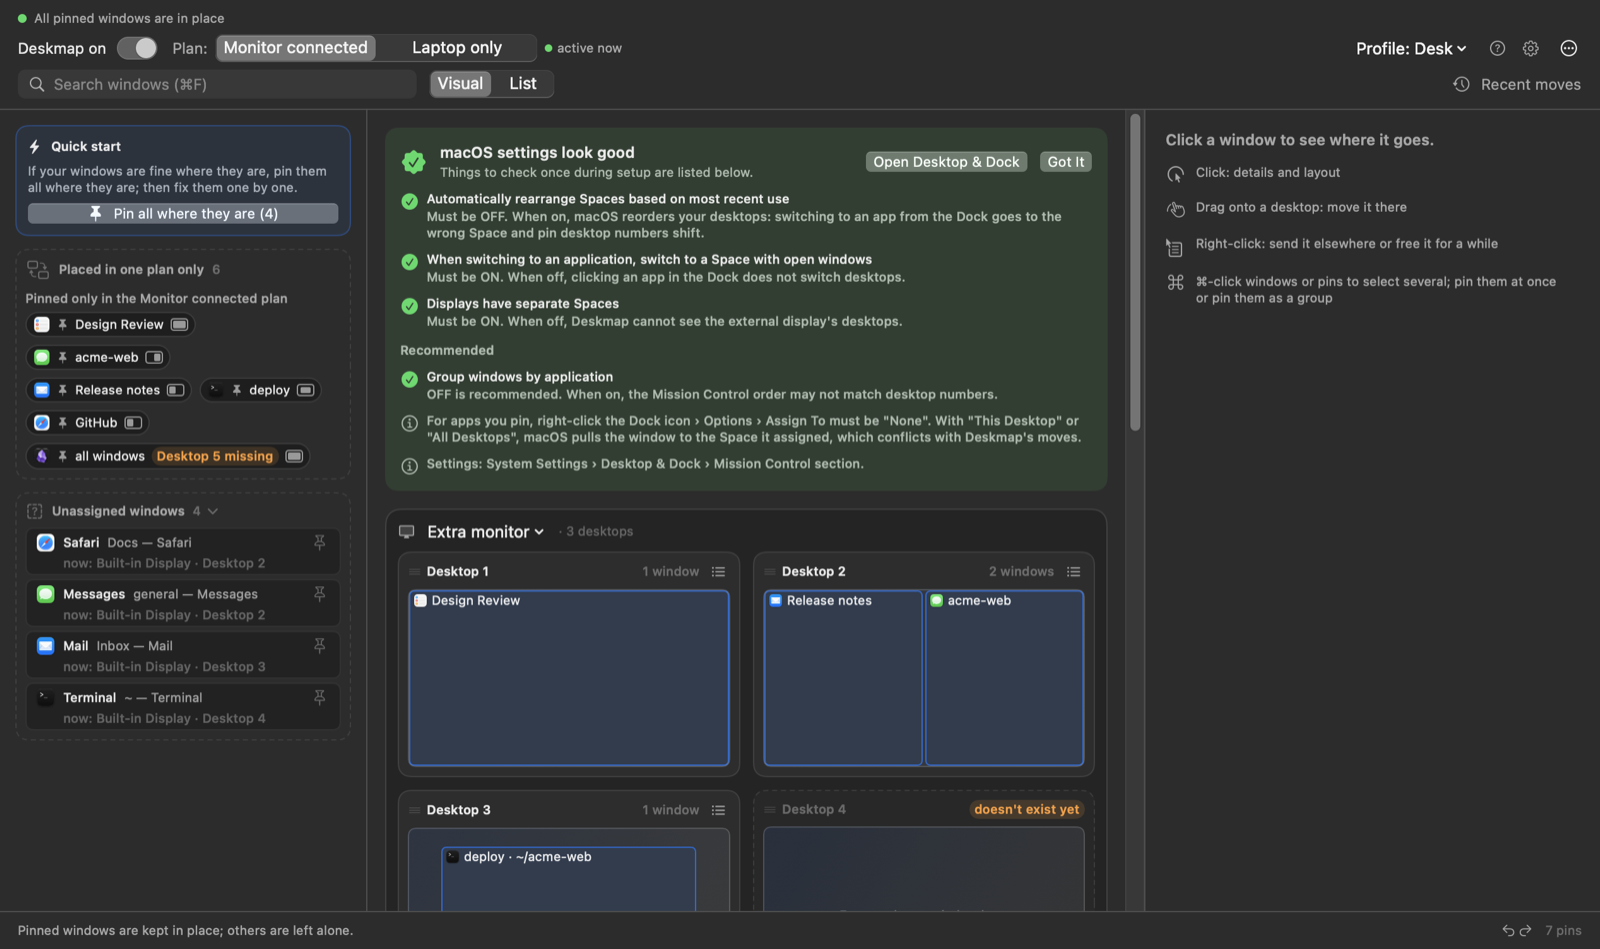
The app checks these live: the welcome guide's second step, the Settings › macOS Settings tab and, if one of them goes wrong later, an orange card on the map. Click Open Desktop & Dock and set:
| Setting | Must be |
|---|---|
| Automatically rearrange Spaces based on most recent use | Off |
| When switching to an application, switch to a Space with open windows | On |
| Displays have separate Spaces | On |
| Group windows by application | Off (recommended) |
One more, which macOS won't let any app check: for every app you are going to pin, right-click its Dock icon › Options › Assign To → None. If macOS has assigned the app to a desktop itself, it will fight over the window.
3. Pin your first window#
- Open the window you care about — say a project in VS Code.
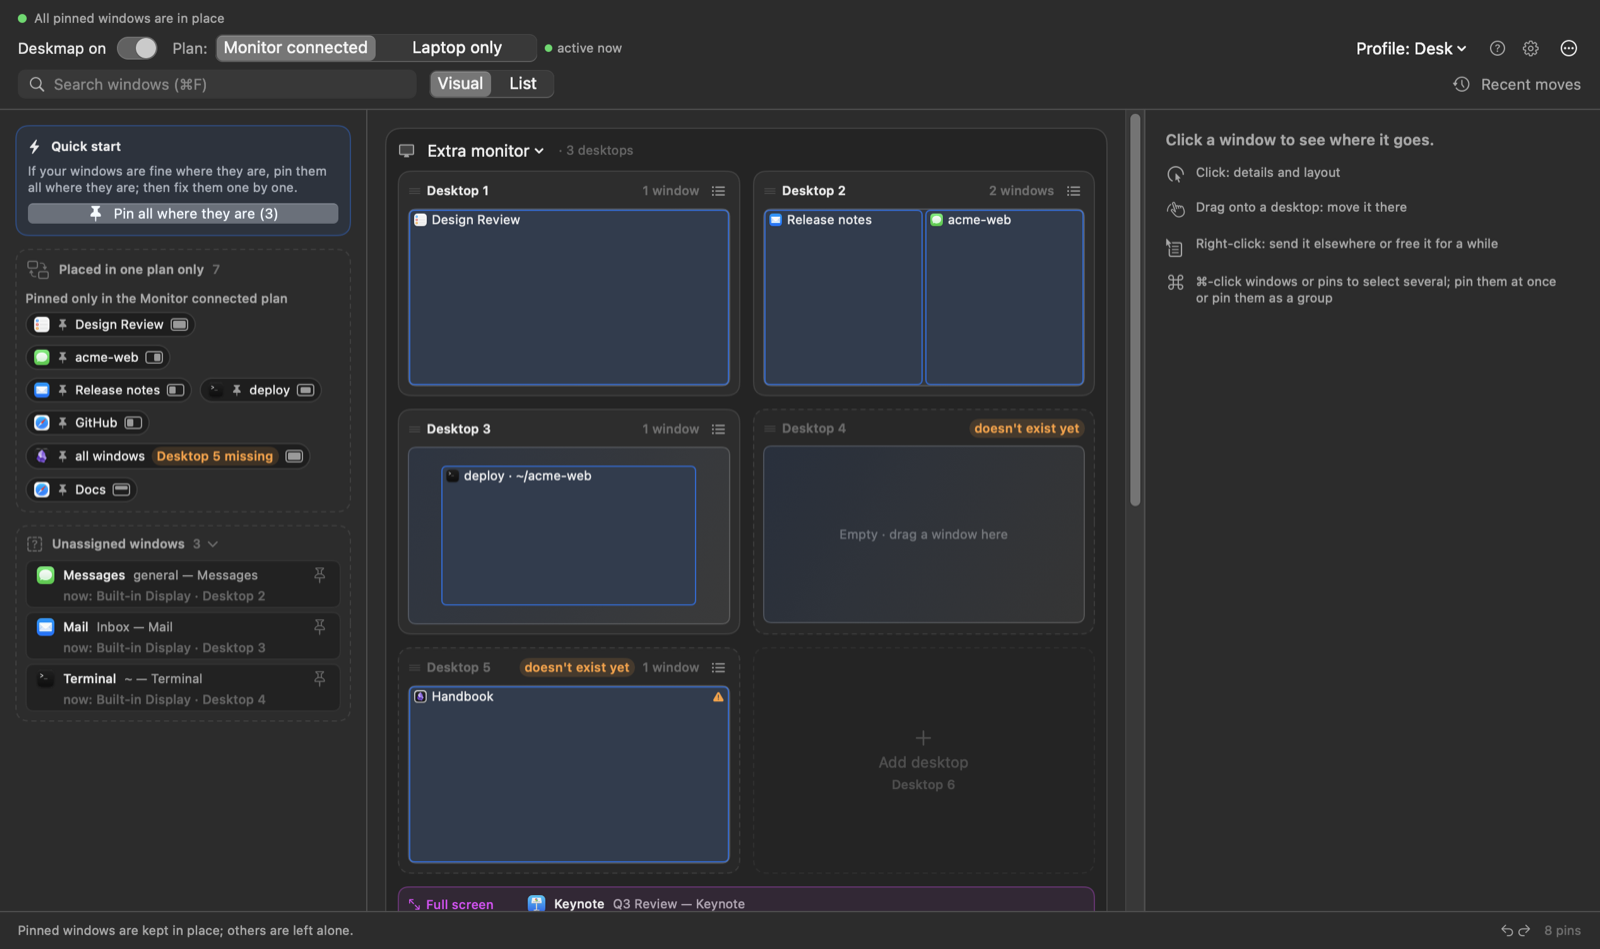
- Click the menu bar icon. The map shows each display with one small card per desktop. A card is a mini screen: every window on that desktop is a box at its own place and size. A card that gets crowded stacks the boxes that cover the same area, each with its title showing, and tucks the rest behind a +3 more-style button; the ≡ button on a card opens its plain list. Looking for one window? Press ⌘F and type part of its name.
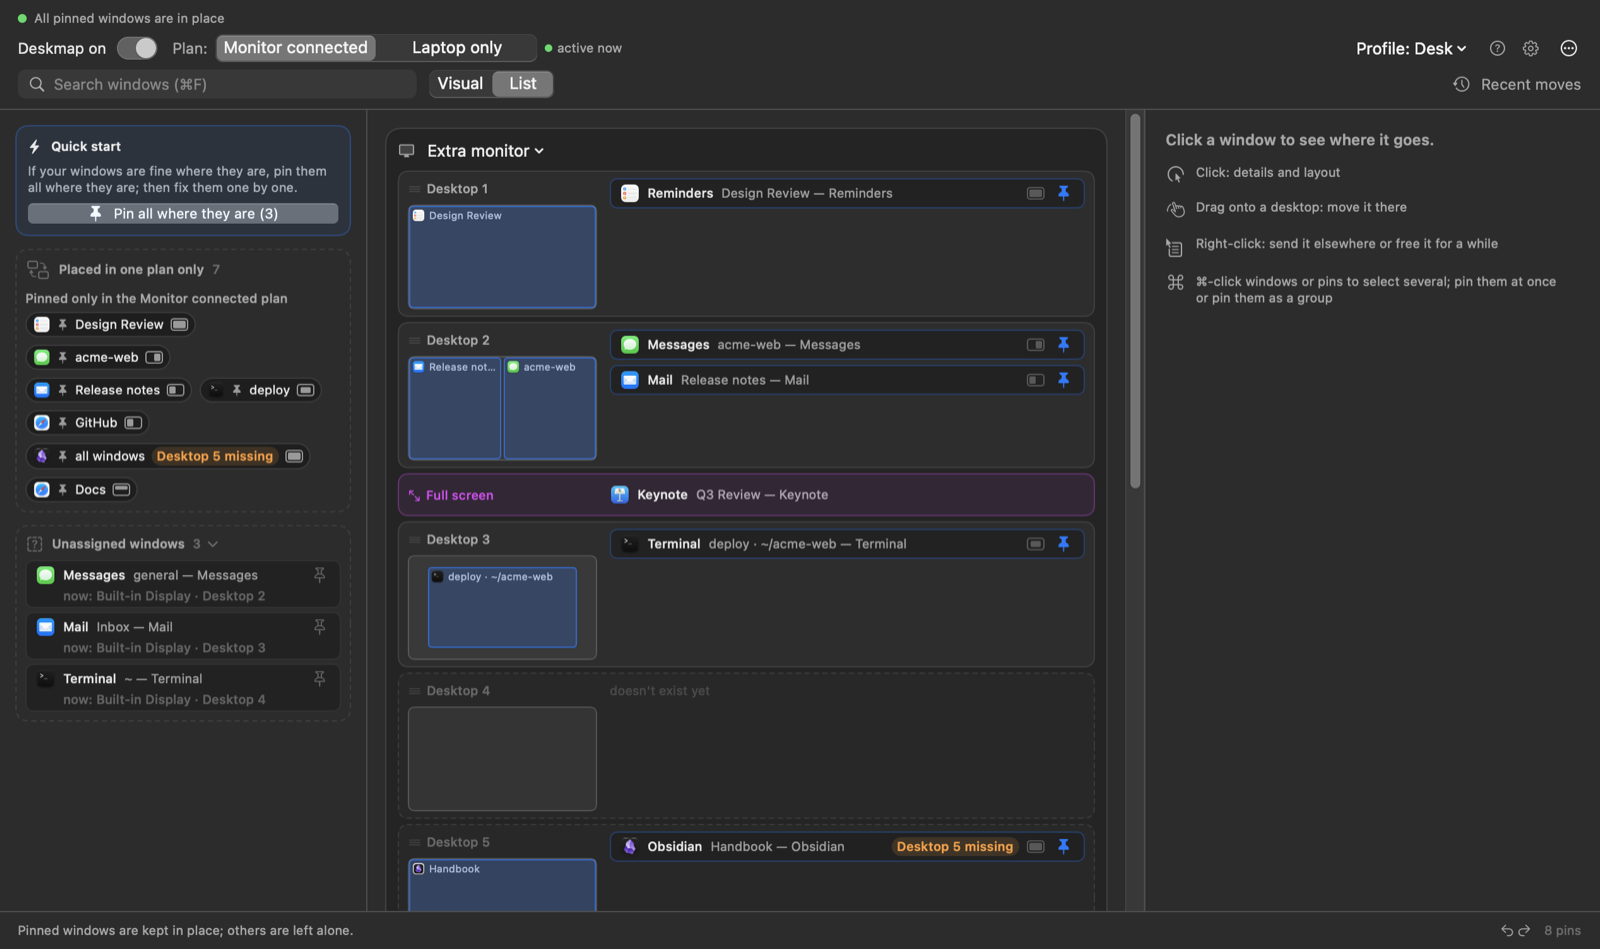
Prefer rows? List (next to Visual) shows one row per desktop with a small preview next to it. 3. Find your window and click its box (or right-click it › Pin to this desktop…). Its details open in the column on the right. Windows that don't belong anywhere yet wait in the Unassigned windows box on the left, each showing where it is now; click one there, or its pin button.
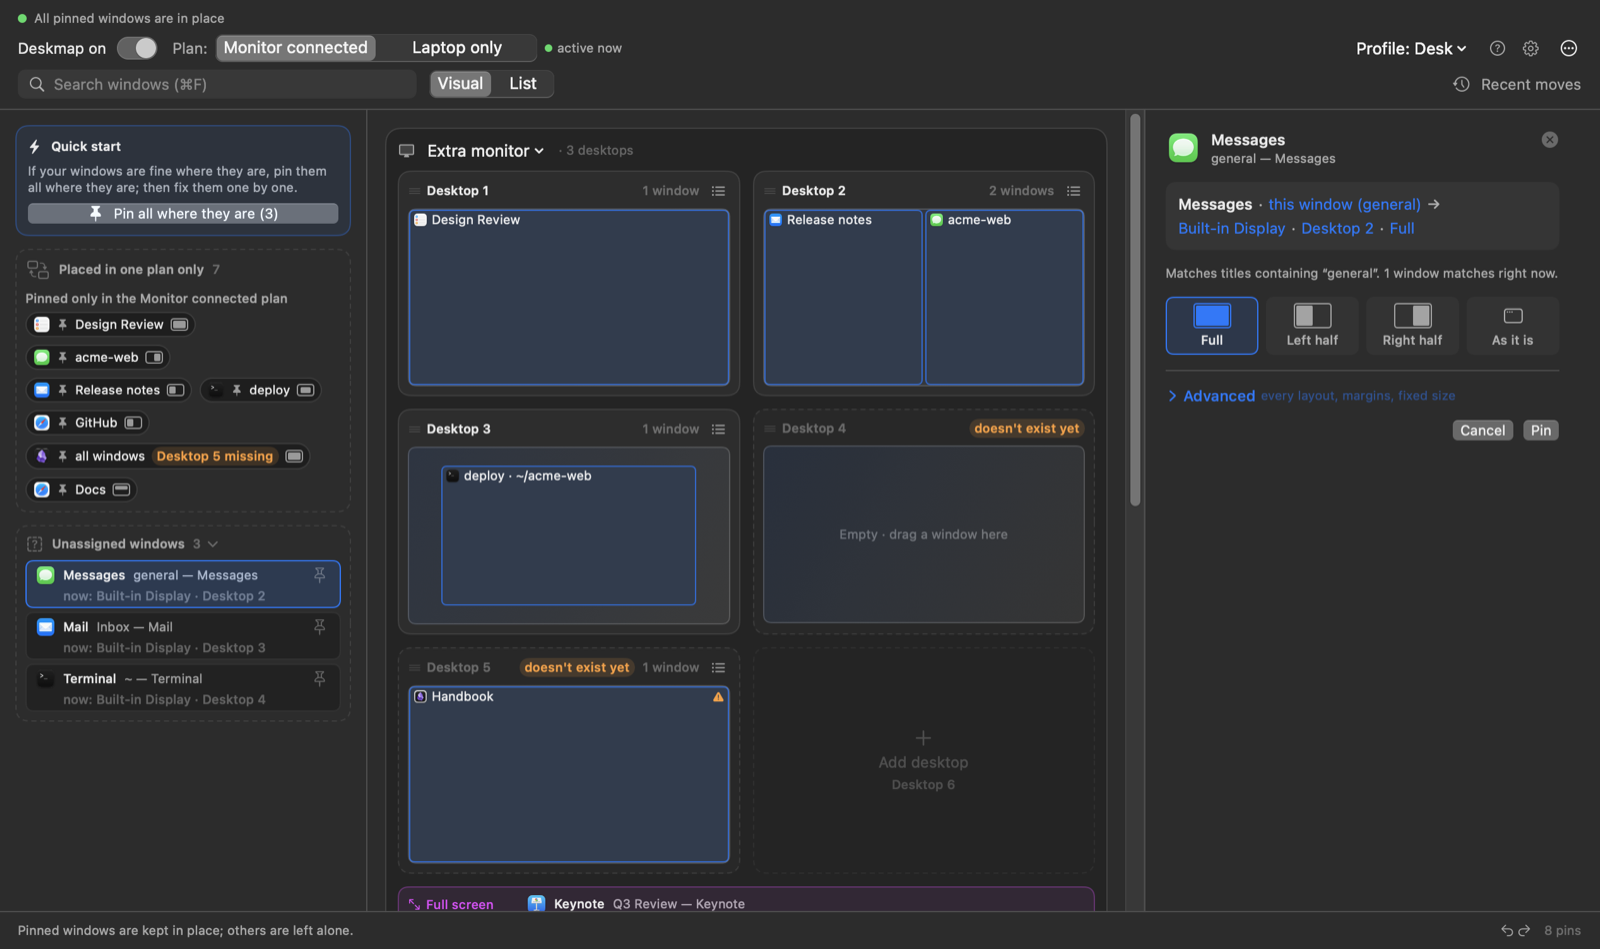
The panel starts with one sentence, for example Messages · this window (general) → Built-in Display · Desktop 2 · Full. Each blue part is a link that opens a menu. The first one offers two choices:
- This window (key) — Deskmap works out a stable key for the window and shows it in brackets. In order: the file the window shows (Preview, Pages, Word, Excel, TextEdit… — two different
main.pdffiles stay apart); otherwise the part of the title that has stayed the same while the title changed (VS Code's project folder, Terminal'suser@host, Safari's tab group); before any title change has been seen, a cleaned title (page numbers, "Edited", unread counts dropped). The panel tells you how many open windows match right now. - All windows of the app, whatever the title. Good for Mail or Slack.
If the window has no stable key (every part of its title changes, like a Safari window without a tab group) or the key would also match another open window, only All windows is offered.
- This window (key) — Deskmap works out a stable key for the window and shows it in brackets. In order: the file the window shows (Preview, Pages, Word, Excel, TextEdit… — two different
Click Pin (or press ⌘Return).
Under the sentence, the Display and Desktop menus move the pin somewhere else, and at the bottom a Why here? box says in plain words which pin put the window there.
Several windows at once: the Quick start card at the top of the left sidebar has Pin all where they are (N) (or ⌘-click boxes to pick some); confirm in the right-hand column. Each one keeps its current desktop, size and position.
That's a pin. Tomorrow's window with the same file or project, the one after a restart — same place.
4. Move it where it belongs#
Drag the window's box (or its chip) onto another desktop's card — on any display. That is how you say "no, this one lives on the monitor, desktop 3". You can also use the Display and Desktop menus in the panel, or right-click the box › Send to. An empty card says Empty · drag a window here; the last card, + Add desktop, adds one to the map.
- Desktops that don't exist yet are drawn with a dashed line. macOS only lets you create desktops: open Mission Control and add them, then the card becomes solid.
- Right-click a card to Rename Desktop…, Remove Name or Remove Desktop. Removing a desktop that still has windows asks first and lists the apps (macOS then moves those windows to another desktop).
- Pinned windows that are closed right now wait as chips under the card's mini screen. Open N in the card's header opens all of them at once; each one lands in its pinned place.
- An app group (for example all Excel windows on a desktop) has its own button at the right of its header: ↗ opens its closed pins, ✕ closes all its pinned windows (the app keeps running, unpinned windows are left alone, unsaved documents still ask). Works for every app.
- An orange Desktop 5 missing badge means the pin wants desktop 5 but the display has only 3, so the window waits on the last one (hover it for the details).
- Dragging an unpinned window moves it once and saves nothing.
Pin groups#
A desktop can hold many pins; a pin group collects some of them under a name. Example: a desktop has ten pinned PDFs, four of them belong to one paper. Group those four and they move, open and close together.
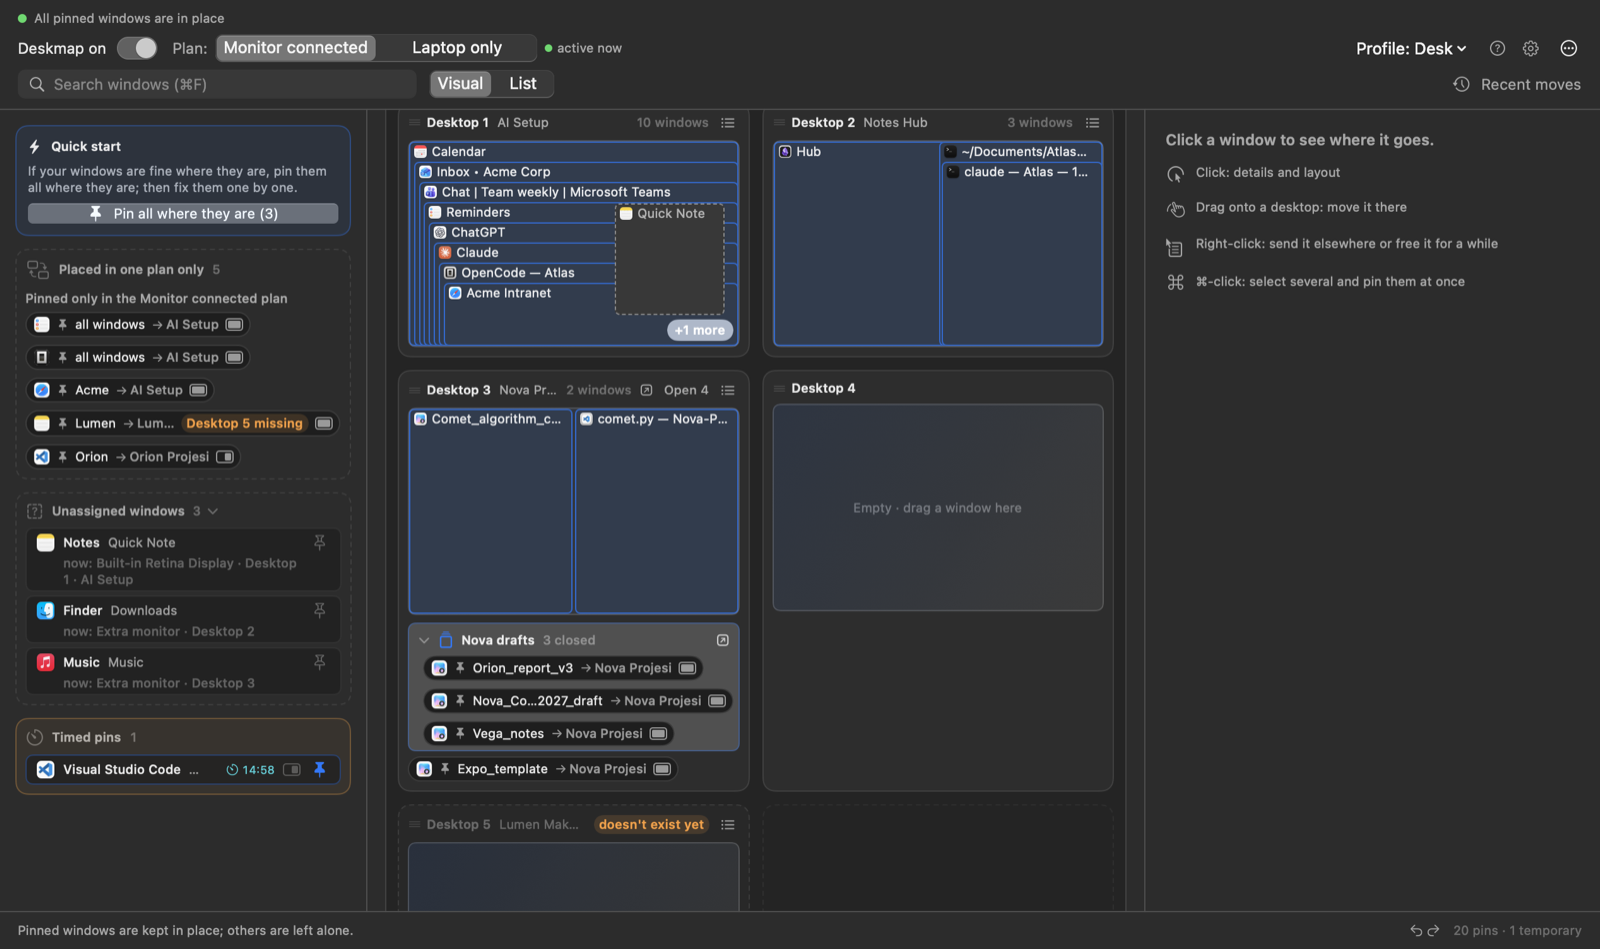
- Make a group. ⌘-click windows and pin chips (closed pins too), then press Pin as group in the side column (it reads Group N pins when everything you selected is already pinned). Pins that already exist keep their places; new windows are pinned where they are. Or right-click a chip or a pinned window › Add to group › an existing group or New group…. A pin is in at most one group: adding it to another group moves it there.
- Name it. A new group starts as Group N (the first free number) with its name field open; double-click the group's header (or right-click › Rename group…) to rename it later. An empty name is not accepted.
- Open and close. The button at the right of the header opens every closed pin of the group, or closes every open pinned window of it (in the current plan). Right-click › Open all / Close all does the same.
- Move it. Drag the group by its header onto another desktop, or right-click › Send group to. Every pin of the group goes there, even ones that sit on other desktops: a scattered group comes back together. Moving to a named desktop works like moving a single pin: members without a place in the other plan get that name there too.
- One pin moved alone stays in its group. The header then shows also on Desktop N (or also on another screen). To take a pin out, right-click it › Remove from group. Unpinning a member (or dropping it on the tray) also takes it out, in both plans: pinning that window again later does not put it back. Ungroup (keeps pins) removes the group, never the pins. In the Add to group menu, groups with the same name show their pin count.
- Temporary pins are not grouped. A selected window that already has a temporary pin keeps it and stays out of the group; a window whose title also matches other open windows gets a temporary pin the usual way. Pins of the other plan (the tray) can't start a group from this plan; the side column says so when you select one. A window held by an app-wide pin (all windows) gets its own pin by title, so the group holds only the windows you selected.
- Undo (⌘Z) covers every group change. Restoring a backup made before you grouped also removes the groups.
- Groups are optional fields in
rules.json. An older Deskmap ignores them, and if an older version saves the file, the groups are lost (the pins stay). Don't run two Deskmap versions at the same time.
5. Give it a size#
Click a pinned window's box or chip. Under the sentence are four layouts: Full, Left half, Right half and As it is (only the desktop is kept; Deskmap never moves or resizes the window there). If the window has some other layout, a fifth tile, Custom, shows it, with its full name under the row. Everything else is under Advanced ▸: the title parts, a grid to drag across, the other presets (70/30, top/bottom half, corners, center; the same set on every display), a gap to leave from the edges and a fixed size. Advanced stays open for the next window once you open it. Which layouts appear as tiles and in Advanced is up to you: Settings › Layouts (add your own on the grid, rename, hide, reorder).
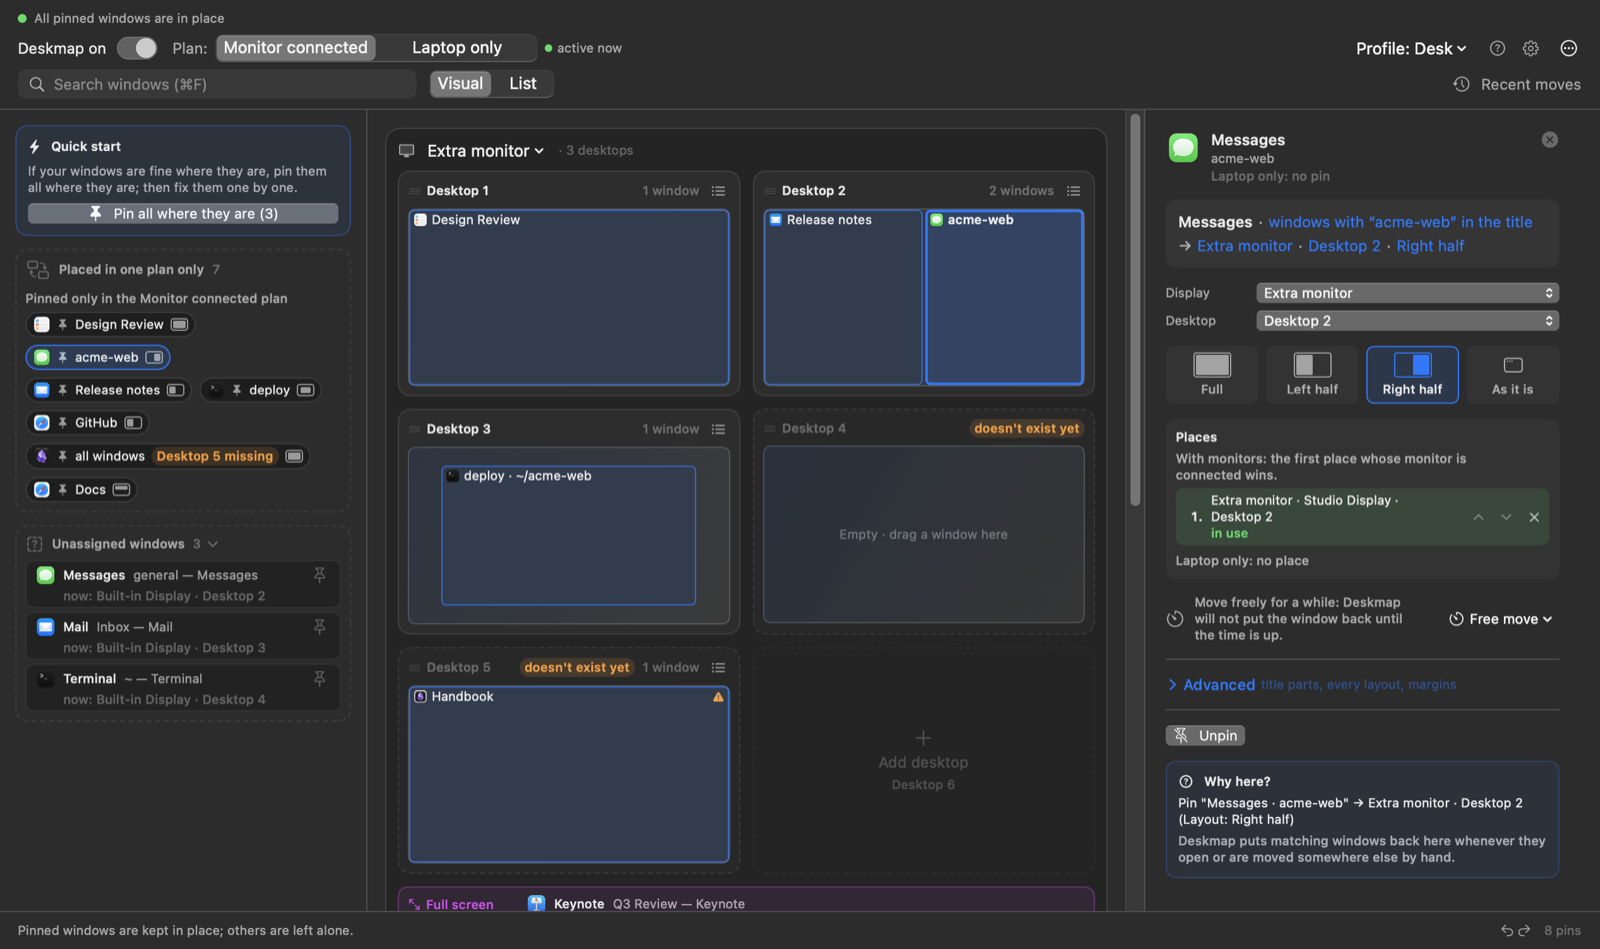
The layout is applied once per window. After that, resize it however you like — the app won't keep snapping it back. Press ⌘R (or ⋯ › Place pinned windows now) when you want everything placed again from scratch.
Need to move a pinned window by hand for a while? Free move in the panel, or right-click its box › Free move › 5, 15, 30… minutes. Deskmap leaves it alone until the time is up, then puts it back.
Found a size you like by hand? Click the pinned window, open Advanced and press Use current size and position: the window's current place and size become the pin's layout. The pin stays on its display and desktop. Undo with ⌘Z if you change your mind.
6. Two plans: with monitor, without#
Your windows can't live on desktop 3 of a monitor that isn't plugged in. So every pin has two targets, and the Plan switch at the top (⌘1 / ⌘2) shows one or the other. The plan in effect right now is marked active now; the other one says when it applies.
- Monitor connected — at least one external display is attached.
- Laptop only — just the built-in screen.
The two plans are set up separately. If a window sits in the same place in both (say Safari on the laptop screen, desktop 2) but with a different layout, its panel offers Use the Laptop only plan's layout (or the Monitor connected one): one click copies it over once, and the plans stay separate afterwards.
With two external monitors the map shows a card for each (Extra monitor, Monitor 2). Each monitor keeps its card wherever you place it in System Settings › Displays; if the two are the wrong way round, click the title of the Monitor 2 card, pick the other monitor and confirm (their layouts swap with them). Drag a window to another monitor and its old place is kept: when that monitor is unplugged, the window goes back there. A window with no place on any connected monitor goes to the first one in order (Extra monitor first).
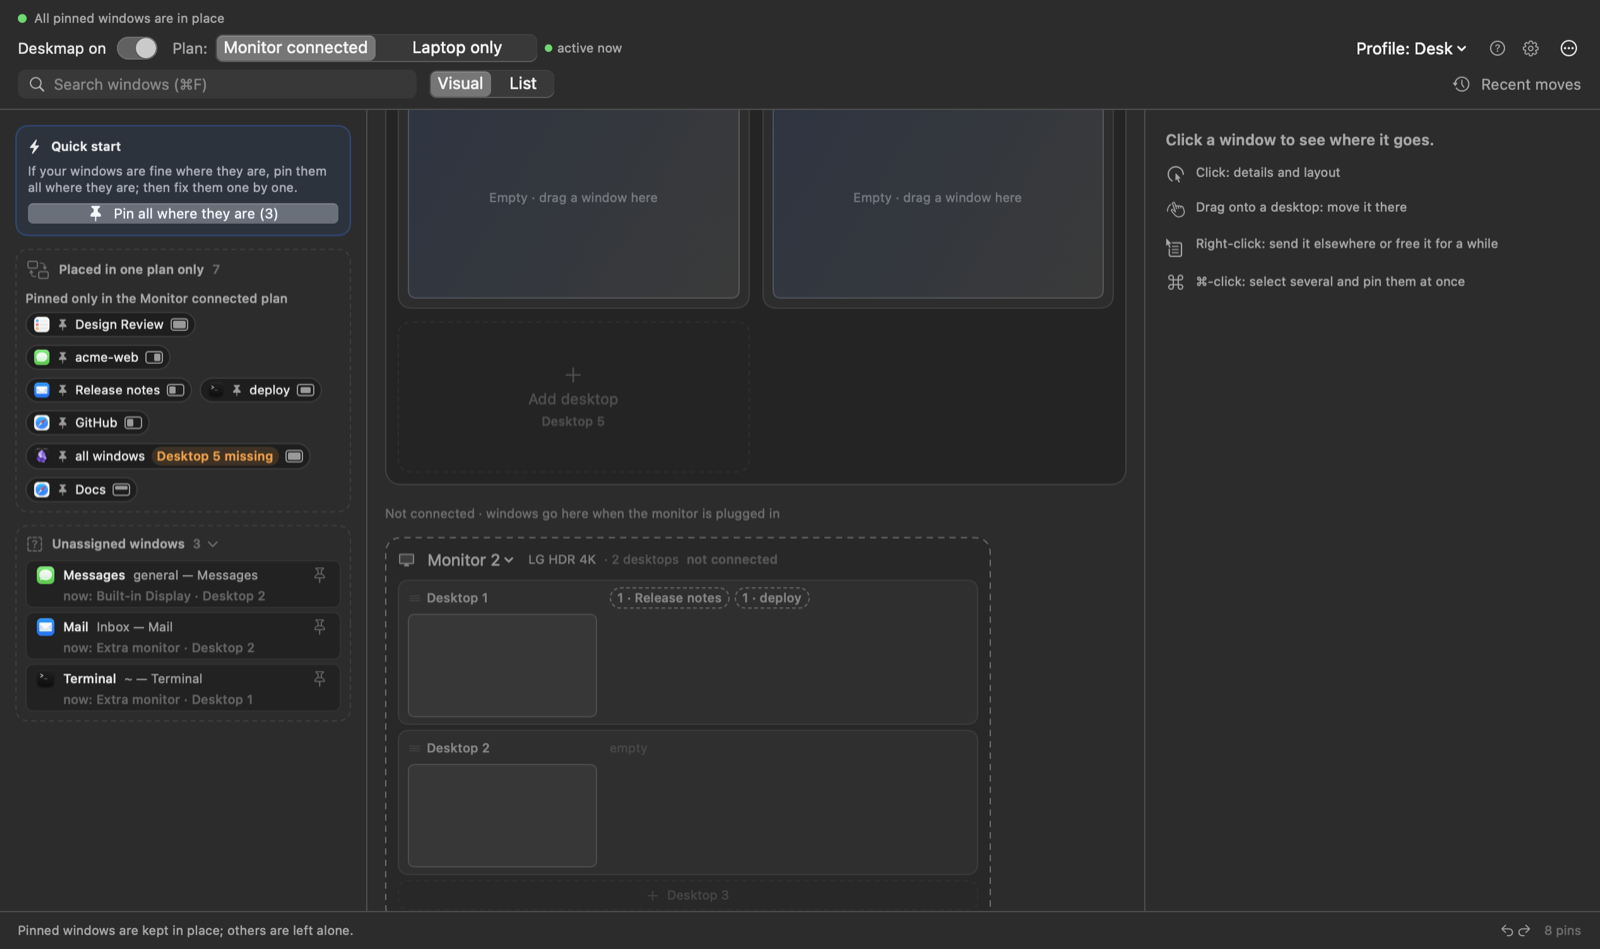
A monitor Deskmap knows but that is not plugged in stays on the map as a faded, dashed card below the others, with its model name and not connected. Dashed chips such as 1 · Release notes show the pins that go there when it is plugged in (the number is the place in the pin's list). Drop a window on a faded card to give it a place there; that place goes first.
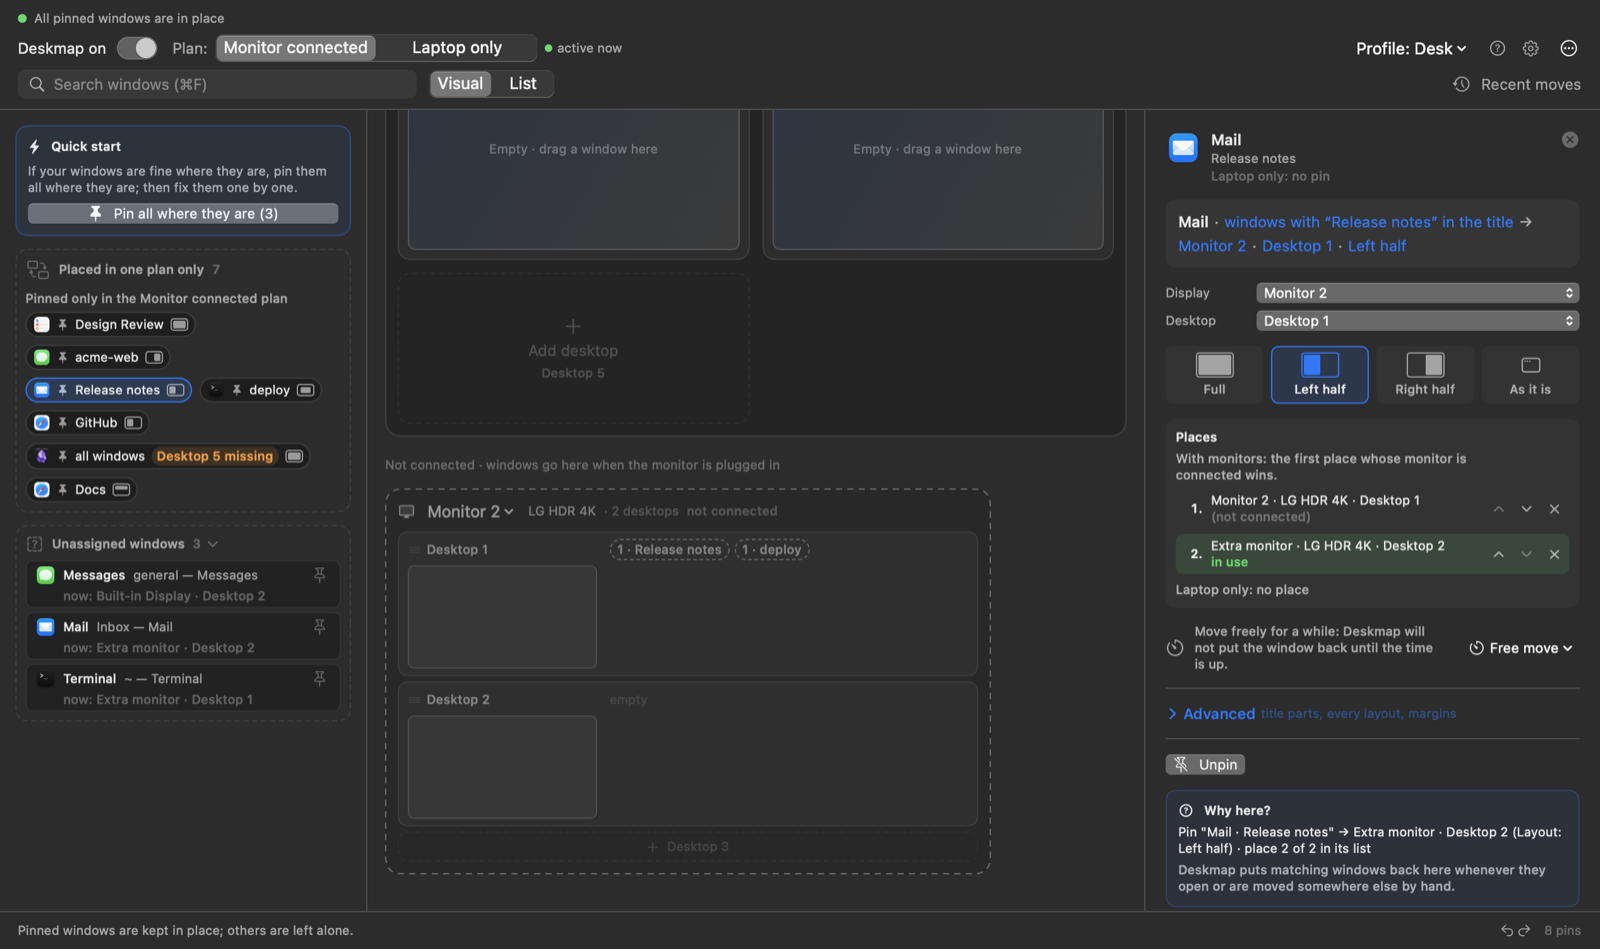
Click a pin to see its Places: the list in order, the one in use in green, the others marked (not connected). ↑ and ↓ change the order, × removes a place (⌘Z undoes). If none of them is connected the panel says the window is on the fallback monitor for now. Why here? says which place won.
A monitor Deskmap has never seen waits: its card says new monitor · layout on hold and nothing moves to it. Add to the end gives it its own place after the others; Replace… lets it take the place, and the whole layout, of a monitor Deskmap knows. Both ask first.
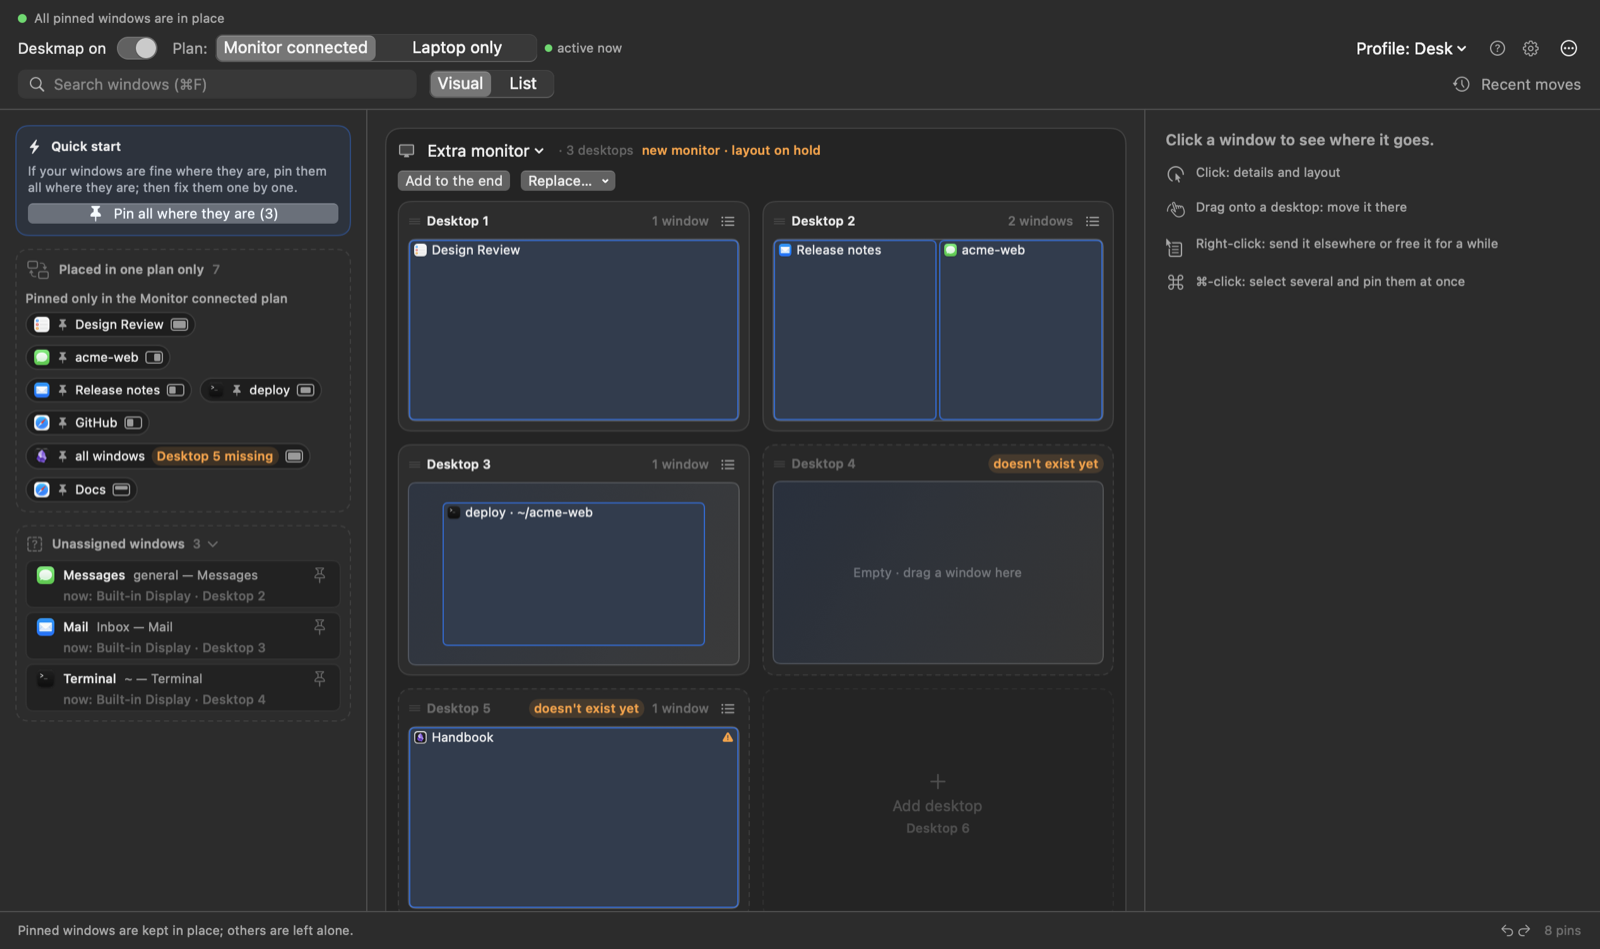
If the waiting monitor sits in the role of a monitor that is unplugged, that monitor keeps its own faded card with its own pins.
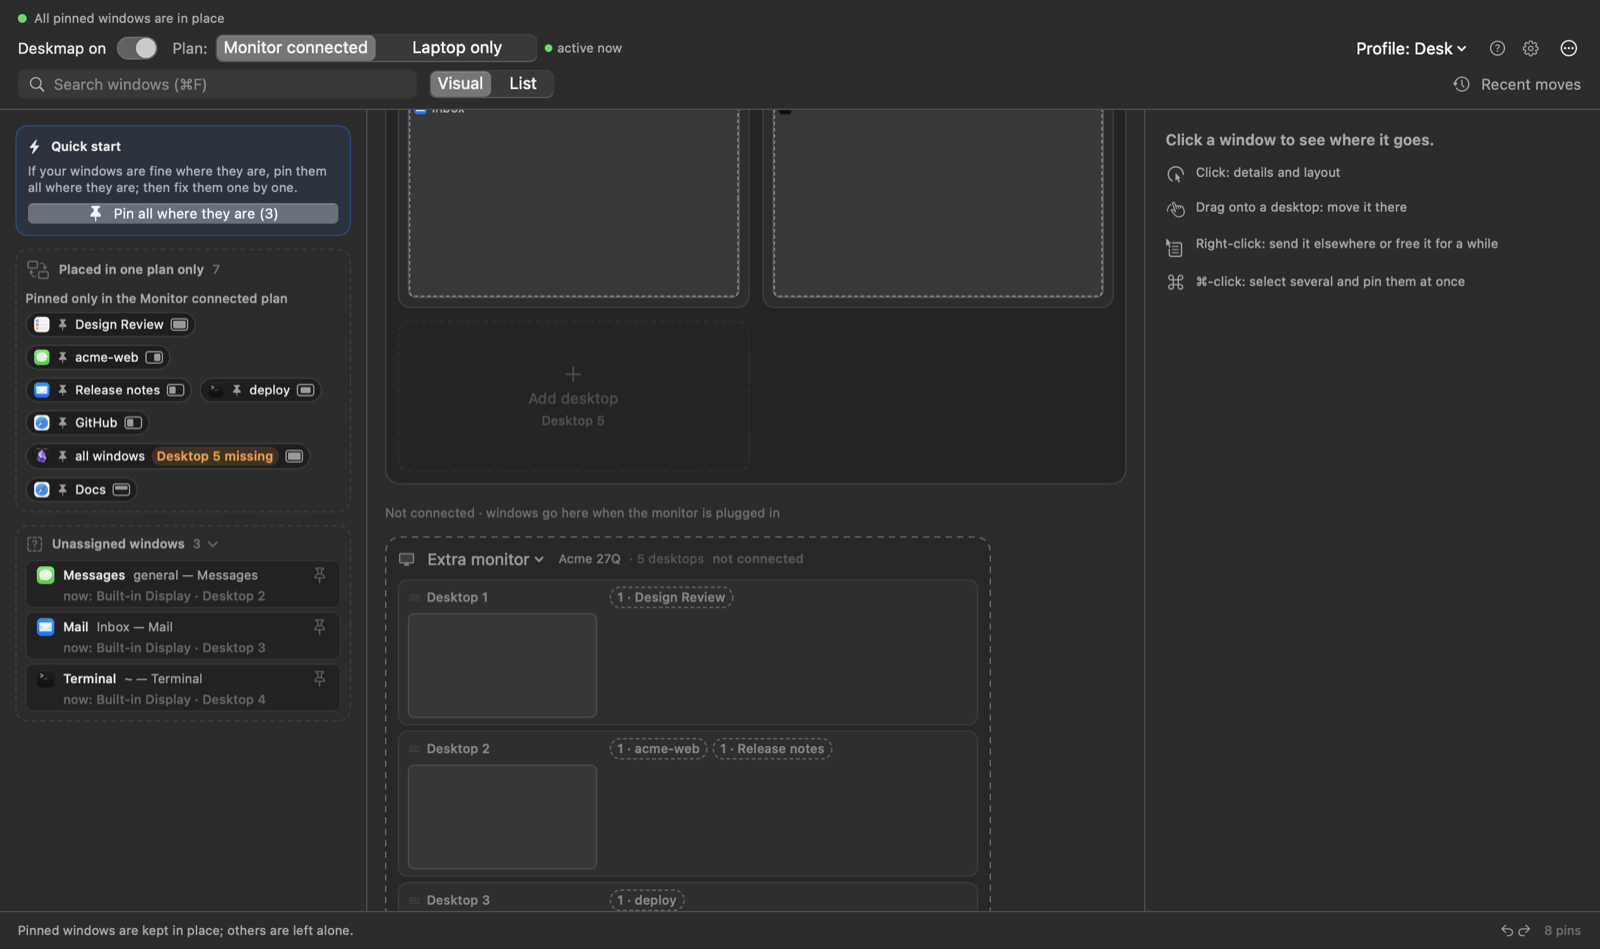
Set up one, switch, set up the other. When you plug the monitor in or pull it out, the app waits a couple of seconds for the displays to settle and then puts every pinned window where that plan says.
A pin you don't want in one of the plans: drag it to the Placed in one plan only box in the left sidebar. It stays in the other plan. To drop a pin that is listed there for the other plan, click it and use Unpin in the … plan.
7. Profiles: desk, café, presentation#
A profile is a whole set of pins with a name. Profile: … ▾ in the toolbar switches between them instantly.
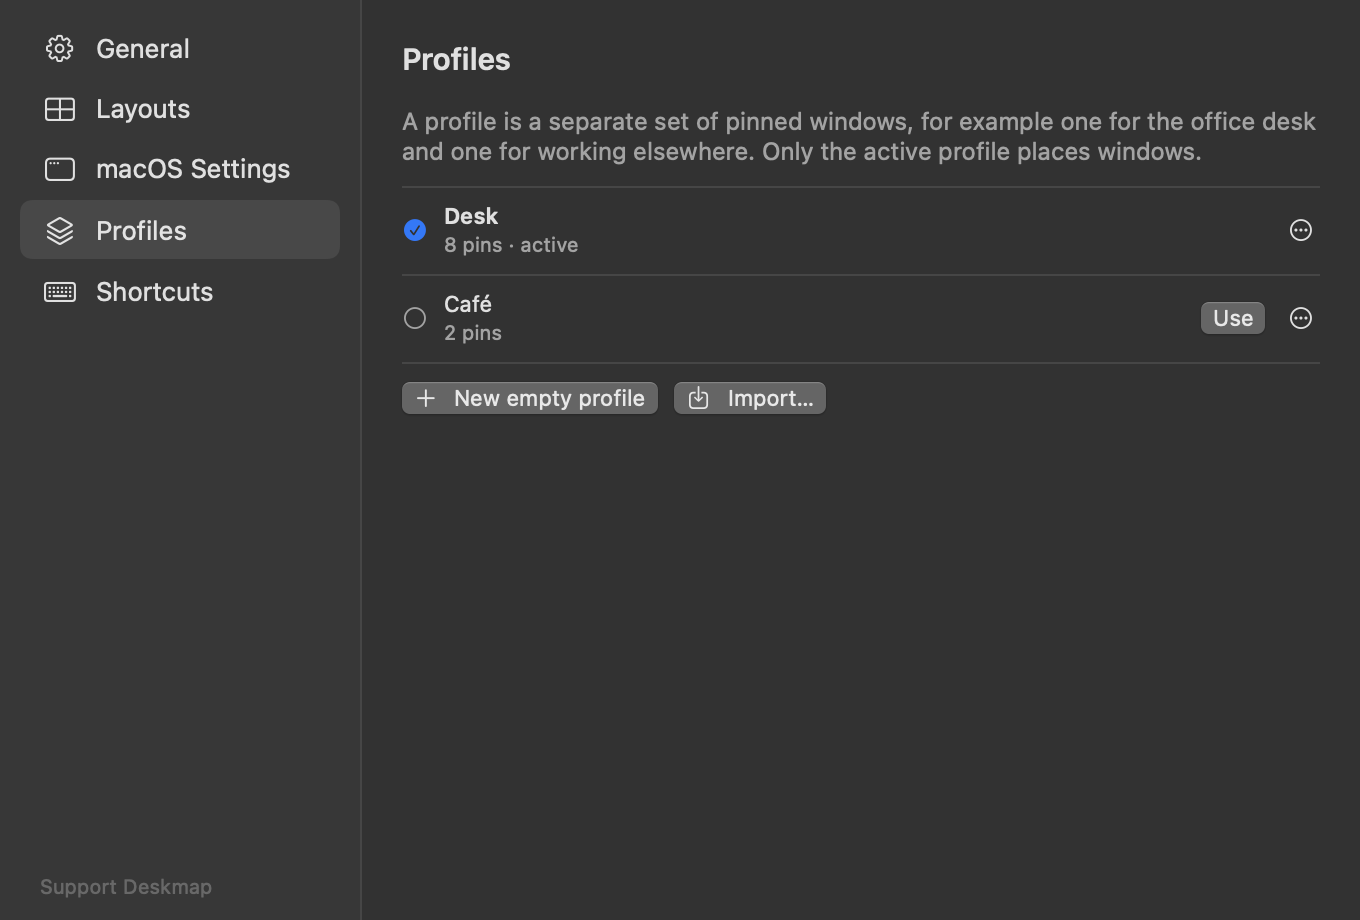
- Settings › Profiles lists them: Use switches, ⋯ renames, duplicates, exports or deletes; New empty profile and Import… below. A new or duplicated profile does not switch on by itself: press Use.
- Desktop names belong to the profile that gave them: a new profile starts with no names, and renaming a desktop in one profile never changes another. See Desktop names and your monitor.
- Export writes a
.deskmap.jsonfile — that's how you carry your setup to another Mac, or share it. - Settings › Backups: Deskmap backs up all profiles, pins and desktop names by itself — one copy per hour for the last day, one per day for the last week, one per week forever. Click Restore on one, then Replace current profiles; your current state is backed up first, and the map's footer offers Undo (⌘Z). Back up now takes a copy right away.
- ⋯ › Copy the Laptop only plan here (Monitor connected plan) copies the laptop pins and the order of the laptop desktops (with their names) into the Monitor connected plan; a name that was elsewhere in that plan moves with it. Windows are moved to match, but no desktop is removed.
8. When you change your mind#
- Undo / Redo: every settings change is a step. Press ⌘Z to undo and ⇧⌘Z to redo, or use the ↶ ↷ buttons in the footer. Recent moves › Changes lists this session's steps; Return here on any row jumps back (or forward) to it. Almost nothing asks for confirmation; Undo is why. The one exception is removing a desktop that still has windows.
- Recent moves › Window moves (toolbar): which pinned window Deskmap sent where, and when — the answer to "why did my window jump?".
- Pause: the Deskmap on switch at the top left, or right-click the menu bar icon › Pause for 15 minutes. Nothing is moved while it is off, and the menu bar icon shows a pause sign. Flipping the switch yourself during those 15 minutes cancels the timer. A switched-off Deskmap stays off after restarts, so if the app ever seems asleep, look there first.
- ? in the toolbar explains every color and badge on the map.
Right-clicking the menu bar icon also offers Pin it where it is for the front window, the free-move times for a pinned one, the profiles, Settings and Quit. A left click opens the map.
9. Desktop names and your monitor#
A name belongs to one physical desktop, not to "desktop 2 on the monitor". Move the desktop, reorder it in Mission Control, or carry it to the laptop screen: the name goes with it, and so do the pins that point at the name.
Dragged to the other display by mistake? If you drag a desktop to another display in Mission Control, Deskmap moves it back to its display and place (a new desktop with the same name and windows) and shows a card with Keep it there. Settings › General › Desktop dragged to another display turns this into a question (Ask) or off (Leave: the name follows the desktop).
Each setup — Monitor connected and Laptop only — has its own plan: which names live on which display, in which order, and how many desktops each display should have. You don't write the plan; it follows what you do: naming a desktop, dragging a card, reordering or adding desktops in Deskmap or in Mission Control updates the plan of the setup you are in.
When you plug or unplug the monitor, Deskmap applies the plan of the new setup:
- Named desktops keep their windows. Each one is put at its planned place and everything on it moves along, pinned or not.
- Unnamed windows come back. Windows on an unnamed monitor desktop wait on their own laptop desktop (one per former desktop), and return to the monitor when you plug it back in.
- Only empty leftovers are removed. Desktops that this switch emptied or that macOS created on the way are removed if nothing is on them and they are beyond the plan. Desktops with windows, named desktops and your own empty desktops stay.
- Missing desktops are created, up to the plan.
- No deleted-desktop rows. A desktop that vanishes because the display changed is not a deletion; a row appears only when you delete a desktop in Mission Control or in Deskmap.
If a window can't be moved, it stays where it is, its desktop is kept and the footer says so.
Pin to a name. The pin panel and the Send to menu list names first. A window pinned to a name follows that desktop wherever it is; if the name has no desktop yet, the window waits (the map says waiting for …) and nothing is moved. A pin to a name is made for both setups unless the other one already has a place for the window.
First launch after the upgrade. Deskmap first saves your old file (in Backups/pre-migration/, never deleted). Then it matches each name to the desktop where its pinned windows actually are, and shows a card Desktop names upgraded with what it did: names placed, names without a desktop yet, wrong deleted-desktop rows removed and their pins restored. Deskmap does not move a window or remove a desktop in this step. If it found empty desktops beyond your plan, the card offers Remove N empty desktops (each is checked empty again just before it goes). Undo upgrade puts the old file back (nothing is saved until Deskmap restarts); an older Deskmap can only open the new file read-only.
10. One-key setups (optional)#
The app answers deskmap:// links, so anything that can open a URL can drive it:
open "deskmap://profile/Café"   # switch profile
open "deskmap://reapply"        # place everything now
open "deskmap://toggle"         # pause / resume
Put one in a Shortcut and give it a keyboard shortcut, or trigger it from a macOS Focus automation: "when Work Focus turns on, switch to the Desk profile".
11. If something doesn't happen#
| What you see | What it means |
|---|---|
| Window doesn't move at all | Deskmap is paused (top left), or the Accessibility permission was lost after an app update — grant it again. |
| Window lands on the wrong desktop | "Automatically rearrange Spaces" is on, or the app's Dock Assign To isn't None. |
| A pin's chip looks faded | Another, more specific pin matches that window first. Hover it to see which. |
| Orange Desktop 5 missing badge | That desktop doesn't exist; add desktops in Mission Control. |
| A window jumped and you don't know why | Recent moves in the toolbar lists each move and its target. |
| Nothing moves between desktops, but sizes work | An orange card at the top of the window says why. On macOS 15 and 26.0–26.3 desktop moves are off until you click Try Anyway (they are not verified there yet). If moves kept having no effect, Try Again turns them back on. Without a button, this macOS doesn't offer the calls the app uses for desktops. Displays and layouts still work in every case. |
Longer troubleshooting, the full rules of matching, and the data file formats are in the README.
The two sentences to remember#
A pin is a promise about a title: any window whose title contains this part, from now on, belongs here. Everything else is drag and drop — the map is the app.